Perfect Dairy-Free Vanilla Ice Cream
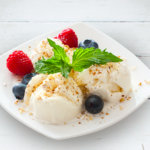
A simple and satisfying plant-based vanilla ice cream that can be customized to just about any other flavor you can imagine!
- Prep Time: 60 minutes
- Cook Time: 0 minutes
- Total Time: 1 hour
- Yield: 6 1x
Ingredients
- 3 cups Homemade Nut Milk or store-bought plant-based milk
- 2/3 cup date sugar, finely ground
- 2 vanilla beans
- 1/2 tsp xanthan gum
Instructions
- Add all ingredients to a high-speed blender and blend until well combined.
- Transfer to a mixing bowl, cover, and refrigerate until chilled through, at least a couple hours (optional if using ice cream maker).
- Once chilled, pour into pre-chilled ice cream maker and follow maker’s directions.
- Serve once ice cream reaches a smooth consistency.
Notes: An equal amount of date paste also works in place of date sugar, but it will change the final consistency of the ‘ice cream’ (date paste has more water in it, and the final dessert will be more like a sorbet). If using raw cane sugar or sucanat, decrease the amount to 1/4 cup plus 2 tablespoons. Always ground dried sweetener using a coffee grinder or small high-speed blender. Vanilla beans should be sliced in half lengthwise and seeds scraped down the sides. Add seeds and pods to blender. I use a Breville Smart Scoop Ice Cream Maker, but a more economical option is one of Cuisinart’s Ice Cream Makers. The main difference is that the Breville maker has a built-in compressor (and it only takes 5 minutes to pre-chill the churn bowl) while the Cuisinart maker requires an overnight ‘freeze’ of its churn bowl. The Breville maker also allows you to select your desired consistency (for sorbet, gelato and ice cream). If you do not want to use an ice cream maker, pour the mixture into a freezer-safe container, cover, and freeze. You may need to check the amount of time it will take for the ice cream to reach the desired consistency. Whether you use an ice cream maker or not, once the ice cream is frozen, it will be very hard to scoop. You should move the ice cream container to the fridge an hour or two before you plan to serve it (or leave it on the countertop for about 30 minutes), and the consistency will be similar to when the ice cream first came out of the maker. My preference is to use paper ice cream pint containers (each recipe makes 1 1/2 pints). They will freeze and thaw more evenly, and it is easy to ‘give away’ ice cream to family and friends as you experiment with new flavors! This recipe may be used as a master to help you create almost any flavor ‘ice cream’ you can imagine (just omit vanilla beans). For example, for nut-based ice cream (e.g. peanut butter, pistachio, hazelnut), add 1 cup nut butter or spread (salt-free, oil-free) to the mix and blend until well combined then proceed with the recipe as directed. For strawberry or raspberry ice cream, puree 1 pound berries, 6 tablespoons date sugar (or 3 tablespoons raw cane sugar/sucanat), and 1/2 teaspoon lemon juice or balsamic vinegar. Purée should be more sweet than tart. Stir purée into the pre-blended base before chilling (for strawberries) or churning (for raspberries).
Find it online: https://pblife.org/recipes/vanilla-ice-cream/